Sunday, June 5, 2016

CRM and PowerApps

In my last blog, I wrote about CRM and Microsoft Flow. While researching for building and registering a custom API for Microsoft Flow, I came across another preview product named Microsoft PowerApps.

What is Microsoft PowerApps?

Microsoft PowerApps is a preview product that enable the users to build custom business mobile/web apps and share those apps with colleagues in no time. The user does not need coding skills to build PowerApps. If you have basic Microsoft Excel skills then you can build an app. Like Microsoft Flow, PowerApps also allows users to connect to cloud apps like SharePoint, CRM Online, Twitter, Google Drive, OneDrive, Office 365 and Custom APIs etc. Microsoft PowerApps and Microsoft Flow work very well together. Both have the same set of prebuilt connections. You can even use Microsoft Flow within PowerApps.
Check the following link to know more about PowerApps.
https://powerapps.microsoft.com

Creating a sample app using CRM Online connection

PowerApps allow you create an app using:
  • Existing data sources like CRM Online,  Salesforce and Twitter etc.
  • Pre-built templates
  • A start from scratch
For this blog, I am creating a PowerApp using a CRMOnline Connection. Here are the steps.
  1. Signup for PowerApps and install the PowerApps app.
  2. In PowerApps, Select New  >> Create an app from your data” >> Dynamics CRMOnline, as shown in the screenshot below.
    2016-06-01_13-07-41
  3. Create a new connection to your CRM Online organisation. In my case, I already have connections, as shown in the screenshot. Click on HPE (or the dataset for your organisation).2016-06-01_13-08-59
  4. Select Contacts from the dropdown and click Connect, as shown in the screenshot.2016-06-01_13-11-24
  5. PowerApps will create an app. The app will have 3 Screens:
    • BrowseScreen1(Home Page with a list of the contacts and a search box)
    • DetailScreen1 (Displays the details of the selected item on BrowseScreen1)
    • EditScreen1(Opens the selected record/new record in edit mode)
  6. On BrowseScreen1, select the gallery as shown in the screenshot and change the items property to as shown below. It will allow the user to search for a name in Full name in CRM and sort the list based on the last name.

    2016-06-03_16-53-55
  7. Now, select the fields in the first item of the gallery and choose the CRM field you would like to display in that control. Please have a look at the screenshot below.
    2016-06-01_13-19-46
  8. Select DetailScreen1. Select any field on the Details screen. It will display all the fields on the screen in the options pane as shown in the screenshot. Click on the purple eye in the options pane to add or remove the fields on the form.
    2016-06-03_22-52-53
  9. Select EditScreen1. Use the options pane to add and remove the fields on EditScreen1 as explained in step 8 above.
  10. For this app, I wanted to add a camera feature. Click on New Screen. Rename the screen to CameraScreen1.

    2016-06-06_11-24-23
  11. Add the camera control to CameraScreen1, as shown in the screenshot. Add the camera control to the screen, as shown in the screenshot.

    2016-06-06_11-50-02
  12. Rename the camera control to MyCamera.
  13. Set the OnSelect property of MyCamera to Back().

    2016-06-06_11-53-56
  14. Select EditScreen1 and select the entityimage field from the options pane.
    2016-06-06_12-01-08
  15. Select the menu represented by 3 dots to go to the Advanced options.

    2016-06-06_11-08-00
  16. Change the ImageX.Image property to If((photos=true), MyCamera.Photo,Parent.Default), as shown in the screenshot.
    2016-06-06_12-04-28
    This will the set the image property of the control to MyCamera.Photo when the value of the photos variable is true, else leave the value to default.
  17. Also set the visibility property of the entityimage control to If((photos=true),true,false).
    2016-06-06_12-09-55
    It will display the entity image only when the value of photos variable is true.
  18. Now add the camera icon next to the save button on EditScreen1 as shown.
    2016-06-06_12-14-44
  19. Set the OnSelect property of the icon to Navigate(CameraScreen1,ScreenTransition.Cover);UpdateContext({photos:true}). When the user clicks on the camera icon it will take the user to the camera screen and set the value of the photo’s variable to true. The picture will be displayed in the entityimage field added in step 14.
  20. Select DetailScreen1. Change the OnSelect property of the edit button to Navigate(EditScreen1, ScreenTransition.None,{photos:false}). On select of the edit button, the screen will navigate to EditScreen1 and set the value of the photo’s variable to false. This means EditScreen1 will not display the entityimage control unless the camera button is clicked.
  21. Save your app. It will add your app to PowerApps and be available to run on your phone and computer.

Testing the App

  • To test this app on iPhone or android, you will need to install the Powerapps app on your phone.
  • When you start the app, it will display the list of contacts. The user can search for a contact by typing the name in the search box. Click the right arrow to go to the details screen.

    2016-06-06_13-05-04
  • Click on the edit icon to edit the record.
    2016-06-06_13-09-27
  • The user can edit the details by changing the values on the edit screen. Click on the camera to add a picture.
    2016-06-06_13-11-10
  • Click anywhere on the camera to take the picture.

    2016-06-06_13-12-54
  • The app will take you back to the editscreen1 and display the picture as shown in the screenshot.

    2016-06-06_13-15-48
  • The app will save the record in CRM. Open the record in CRM and check if the image is updated.

A few things that did not work for me

I am very new to Powerapps. There are a few things I have noticed that does not work well.
  • For the CRM Online connection, If the record has a lookup field, the record will return the guid and object type, but not the name field of the lookup record.
  • Could not figure out how to display the CRM entity image in the app
  • The Add Picture control does not display the camera roll on iPhone. It will always display the iCloud option to choose a picture.


Sunday, May 29, 2016

CRM and Microsoft Flow

This blog is about the new Microsoft Product named Microsoft Flow. A few days ago my colleague told me about Microsoft Flow and my initial reaction was wow, that is cool.

What is Microsoft Flow?

It is preview product that helps you setup automated workflows between different apps.  It can create records, sync files and get notifications etc.. There are a lot of templates available. It supports a wide collection of applications like CRM online, SharePoint Online, Office 365, OneDrive, Twitter, Facebook, Dropbox and even Salesforce and many more.
Check the following link for more information and templates.
https://flow.microsoft.com/en-us/

Setting up a CRM and Twitter integration workflow using Microsoft Flow

As a CRM guy, I wanted to test some of the CRM templates. There are 7 sample templates available for CRM. I tried the "Create Dynamics Leads based on tweets” template.
Here are all the steps.
  • Go to https://flow.microsoft.com/en-us/
  • Search for CRM templates and choose Create Dynamics Leads based on tweets.

    2016-05-30_10-47-11
  • The template will display the permission(login) screen for Twitter and CRM and add the connection details and click Continue.

    2016-05-30_11-02-26
  • The template will display the details of the workflow. It has 3 main parts as shown in the screenshot.

    2016-05-30_11-06-04
  • In the first part, add the query text to look for in new tweets.I have used CreateCRMLead.

    2016-05-30_13-37-05
  • We don’t have to change anything in the second step. The Get User steps is shown in the following screenshot.

    2016-05-30_11-07-08
  • In the next step, change the organisation name to your organisation name and click Create Flow

    2016-05-30_11-08-34
  • The wizard will display the Done button on next screen.

    2016-05-30_11-09-22
  • You can see your workflow under “My Workflows” as shown in the screenshot.

    2016-05-30_11-09-46

    Testing the workflow

  • Logon to your twitter account and tweet with the word CreateCRMLead (or whatever query text you used above) in it.

    2016-05-30_11-35-33
  • Check in the CRM after a few seconds, there will be a new lead as shown in the screenshot.

    2016-05-30_11-38-44
    It will also add some more information in the description field of the lead.

    2016-05-30_11-39-10


    Monitoring the workflow

    You can check the how your workflow is performing from the Microsoft Flow site as shown in the screenshot by clicking on “I” next to the workflow.
    2016-05-30_14-08-14
  • Thursday, May 26, 2016

    Email Signatures in CRM2016

    CRM2016 Update 1 has introduced email signatures in CRM2016. It is very important if you are using CRM web clients. In the past, CRM users used to copy paste their signatures into CRM emails or used email templates for signatures.

    Now you have an option to create one or more personal email signatures.

    1. Go to personal options as shown in the screenshot.

      2016-05-26_16-21-12_thumb2
    2. Navigate to the Email Signatures tab and press New.

      2016-05-26_16-23-37_thumb3
    3. Enter your email signature and press save.

      2016-05-26_16-25-52_thumb5
    4. You have an option to set the email signature as the default by clicking on the Set as Default button.

    Testing the email signatures

    Create a new email activity and your default email signature will appear automatically.

    2016-05-26_16-36-22_thumb5

    There is also a button available ‘Insert Signature’, which adds the signature manually or replaces the default signature. These buttons are highlighted in yellow in the above screenshot.

    Note: The embedded images in the email signature will not appear in the email unless they are hosted on the internet.

    So here you go. Now you have email signatures in CRM2016.

    Wednesday, May 25, 2016

    Response Routing Rules in Voice of the Customer’s surveys in CRM2016

    In this blog, we will explore the response routings functionality of the CRM VOC surveys. It is a very powerful feature. The response routings rules are equivalent to the business rules in CRM.
    Response routing rule  has 3  parts:
    1. General Tab (contains the name of the rule and name of the survey)
    2. Conditions Tab ( contains the conditions to be met on the survey)
    3. Actions (contains the actions to be taken when the conditions are met)
      Actions can be of 2 types
      • Client: These actions will be triggered on the survey itself on run time. for example hiding or showing a question.
      • Server: These action will be triggered out side a survey. for example creating a follow up or complaint etc..
    Routing rules can be used to show or hide the questions, skip to a question and end the survey etc.  based on the responses of the user.
    For this blog, I have created a sample survey with the following 3 questions.

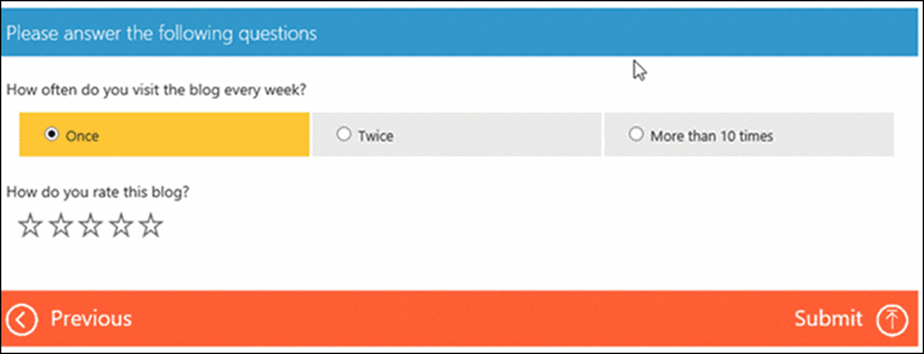
    I have set the visibility field of the 3rd question to “Do not display”.If you preview this survey, it will look like the following screen shot.


    Requirement

    What I want to do is that if the users selects the rating of less than 3 for the second question, the survey should display the 3rd question to the user and also create a follow up task.

    Solution

    We will create a new response routing rule to fulfil the requirement.
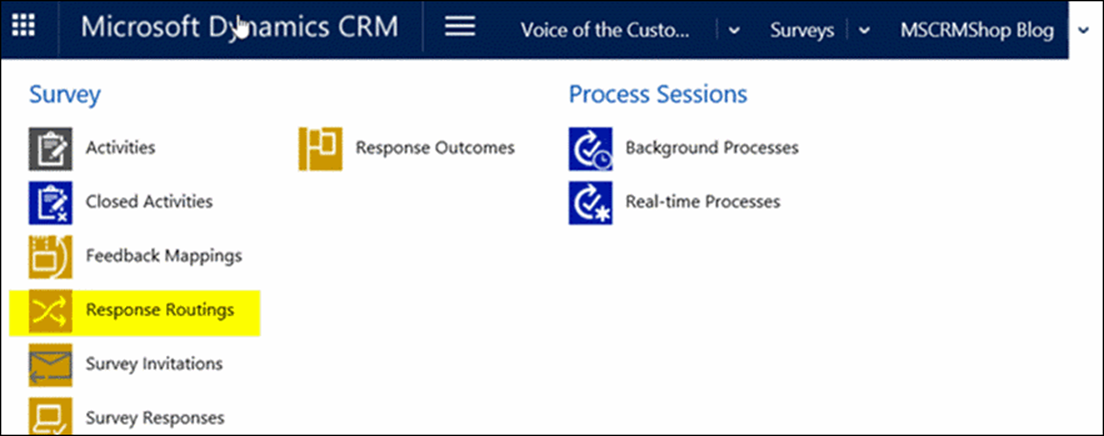
    1. Navigate to the the survey and select Response Routing from the drop down menu as shown in the screen shot below


    2. The system will display the list of Response routings associated with the survey.
    3. The system will display the “New Response Routings” form.
    4. Enter the name for the routing rule and press same
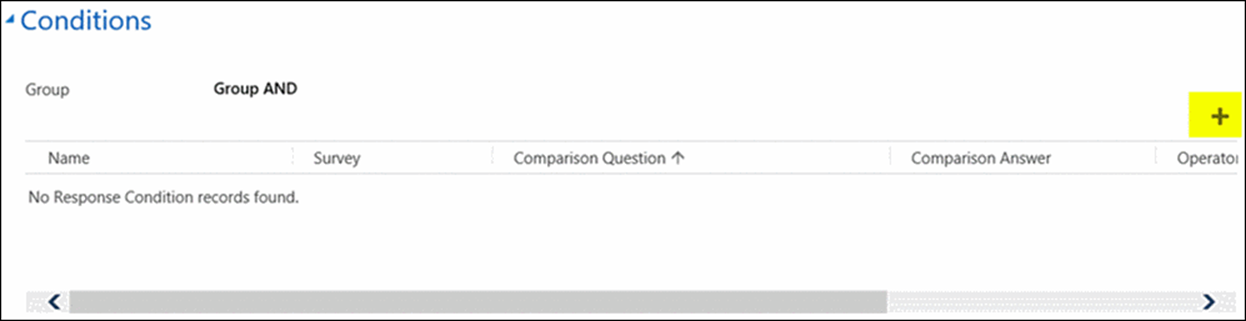
    5. Navigate t the  “Conditions” Tab and a new condition.


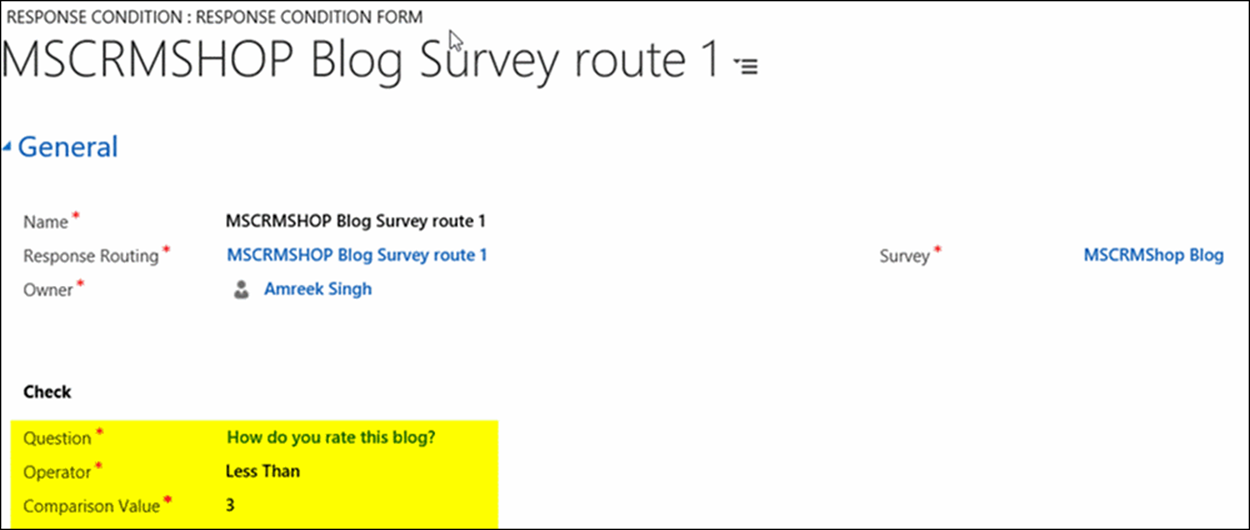
    6. The system will display the condition form as shown in the screen shot below


      The condition in the above screen should is checking if the rating selected in the question 2 is less than 3.
      Note: The options for “Operator” and  “Comparison Value” will change based on the type of question selected. Save the condition.
    7. Navigate to the Actions tab and add a new action.

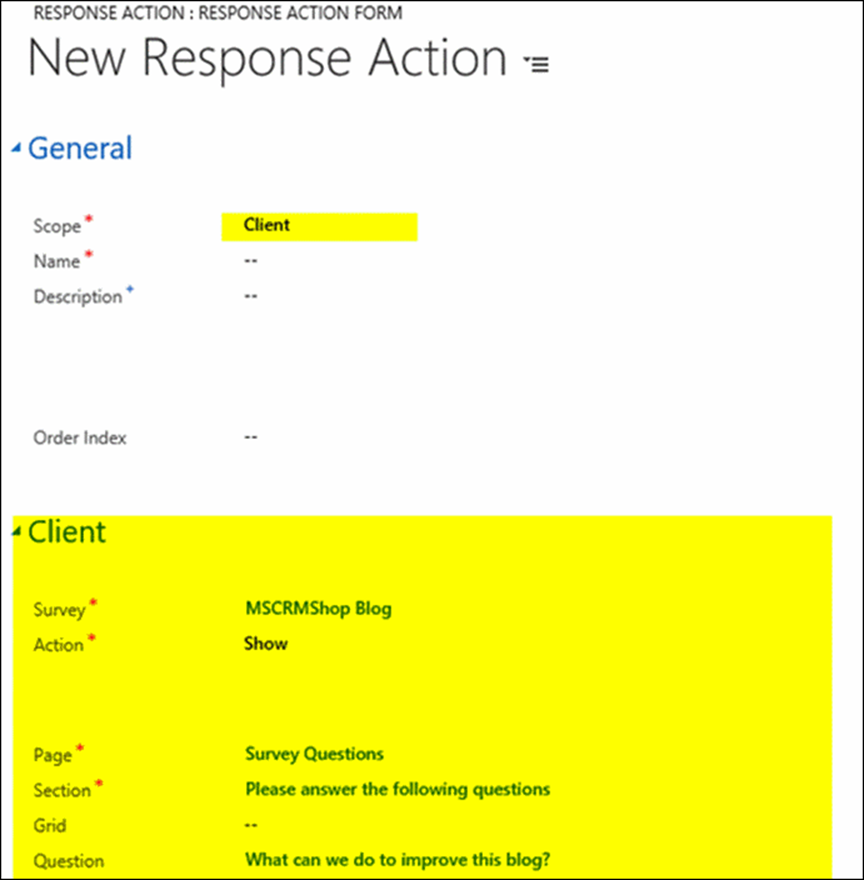
    8. The first action will be triggered on the client side. Select Client from the scope. The action form will look like the following screen.


      The Client tab displaying the actions details. In short, it is saying to display the question 3.
    9. The second action will be triggered on the server side.The action form will look like the following screen.


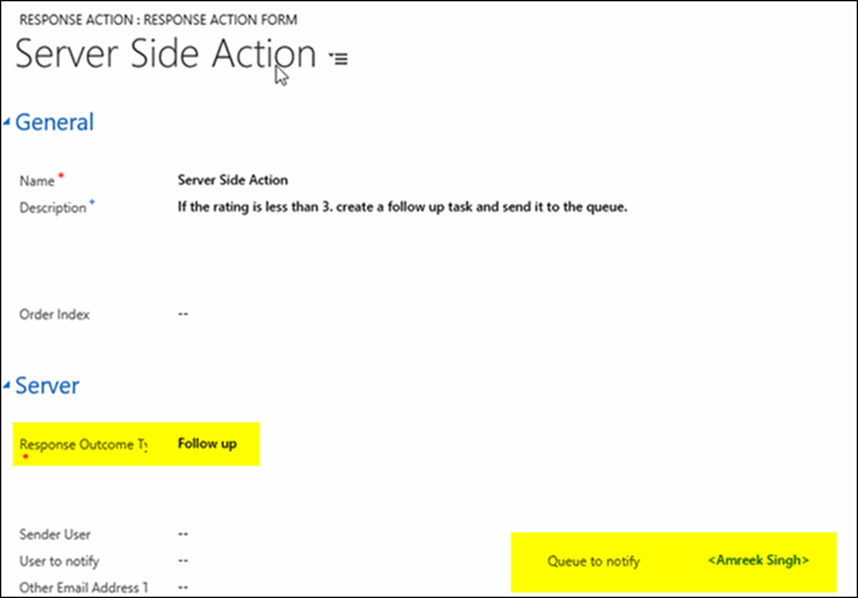
      The Server tab displaying the actions details. The action will create a response outcome record of type follow up add it to <Amreek Singh> queue.
    10. Make sure the response routing rule is activated and test the action.

    Test Results

    Client Side Results

    The following screen shot display the survey screen before responding to the 2nd question.


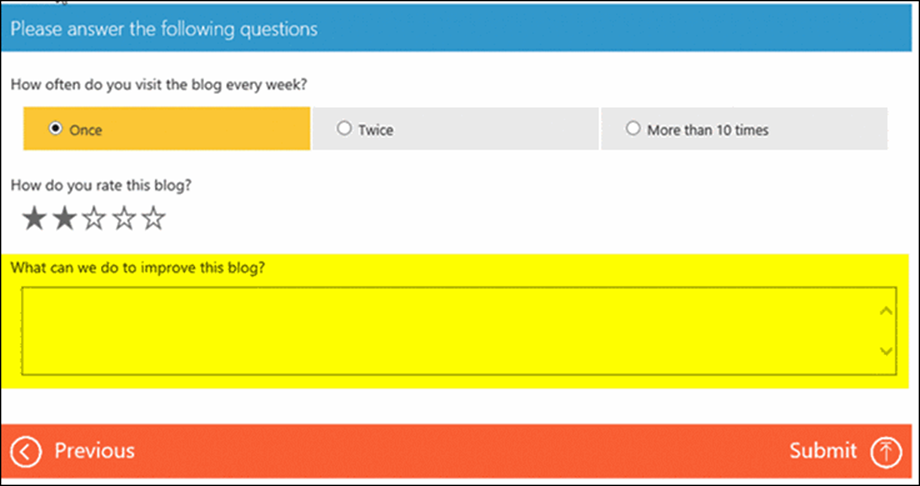
    The following screen shot display the survey screen after the rating of 2 is selected for the 2nd question.

    It is displaying the question 3 as setup in the client action.

    Server Side Results

    The following screen shot displays the response outcome record created by the server side action.

    Sunday, April 10, 2016

    Key values in CRM Lookup fields

    I have been working with CRM for nearly 9 years but I have never been aware of the “Key Values” available in the lookup control. Generally, when we retrieve the lookup control in JavaScript, we use code similar to the following :
     lookupFieldObject = Xrm.Page.data.entity.attributes.get('parentaccountid');   
     if (lookupFieldObject.getValue() != null) {   
     entityId = lookupFieldObject.getValue()[0].id;   
     entityName = lookupFieldObject.getValue()[0].entityType;   
     entityLabel = lookupFieldObject.getValue()[0].name;   
     }   
    
     What are the key values for lookup control?
    If you select the lookup entity on a form, the lookup control also contains a collection of key values that have other fields from the lookup entity. The screenshot below displays the key values available for an account lookup, when I select a parent account from a contact form.
     
    The screenshot displays the collection of other account attributes such as abn, address1state, address1_city, primarycontactid, telephone 1, etc. I did not know that these values were also available for a lookup control. Sometimes we need to retrieve the other attributes of the lookup entity and these key values can be used to retrieve them, instead of making an additional call.
    Where are these values coming from?
    After doing a bit of research, we have found that these attributes/values are coming from the lookup view of the entity.
    Here is the lookup view of the account entity in my system.
    These are the same fields as shown in the Key Values collection in the screen shot above.
     
    Gotchas
    Now to the bad news. These key values are not available all the time. These values are only available if you select the value manually from the form. These values won’t be available if the lookup value is set via code or a workflow. My colleague, Mr. Davey has an explanation, that these values get cached when we select the lookup control on the form. That sounds like a good explanation.
     

    Tuesday, April 5, 2016

    A bit more about SDK “Merge” message in CRM plugins

    One of our clients is using auto numbering on contact records. A few days ago, they reported to have duplicates in the system. So I started the investigation, I could not believe that this could happen in our solution. But what I had found out was that those duplicates were generated as a part of the "Merge" functionality available in CRM. Every time users "Merge" the customer and choose the subordinate's customer number to come across, it will override the master record's customer number with the subordinate record's number.

    So we decided to write a plugin that will stop the users from overriding the master record's customer number.
    The  context.InputParameters  collection of the merge message contains 3 of the following objects
    1. Target ( entity reference of the master record)
    2. SubordinateId ( guid of the subordinate record)
    3. UpdateContent ( temporary entity that contains the attribute that will be passed to the master record).

    The following example does not use the SubordinateId object. We are only using Target and UpdateContent entity. Like any other plugin entity, the "UpdateContent" entity only contains attributes that will be updated in the master record.
    Code
     protected void ExecutePreCustomerMerge(LocalPluginContext localContext)  
      {  
           if (localContext == null)  
           {  
             throw new ArgumentNullException("localContext");  
           }  
           IPluginExecutionContext context = localContext.PluginExecutionContext;  
           ITracingService trace = localContext.TracingService;  
           IOrganizationService service = localContext.OrganizationService;  
           // if the sdk message is merge  
           if (context.MessageName.Equals("merge", StringComparison.InvariantCultureIgnoreCase))  
           {  
             //get the merged entity  
             Entity updateContentData = context.InputParameters["UpdateContent"] as Entity;  
             //if the merged record is null then do nothing  
             if (updateContentData == null) { return; }  
               //get the customer number of merged record  
               string mergedCustNumber = updateContentData.GetAttributeValue<string>("custNumber");  
               if (mergedCustNumber == null) return;  
               else  
               {  
                 // if the merged CustNumber is not null retrieve the CustNumber of the master record to display in the message  
                 // get the master entity reference  
                 EntityReference targetReference = (EntityReference)context.InputParameters["Target"];  
                 //trace.Trace("entity reference " + targetReference.LogicalName.ToString());  
                 //retrieve the CustNumber number of the master entity  
                 Entity target = service.Retrieve(targetReference.LogicalName, targetReference.Id, new ColumnSet("custNumber"));  
                 string masterCustNumber = target.GetAttributeValue<string>("custNumber");  
                 throw new InvalidPluginExecutionException("You cannot update the CustNumber of the Master record. Master CustNumber :" + masterCustNumber + " and New CustNumber :" + mergedCustNumber);  
               }  
             }  
      }  
    

    Some Other Observations
    When I tested this plugin in CRM2013 roll up 2, I did not receive the message thrown using InvalidPuginExecutionException. Instead, I received the following message:
    I think it is a bug in CRM2013, that is now fixed in CRM2013 SP1.

    When I tested the same plugin on CRM2013 SP1 UR3, It displays the proper message, as thrown by the InvalidPuginExecutionException.


    Thursday, February 4, 2016

    Keypress methods in CRM2016

    CRM2016 introduced the new keypress methods for text and numeric fields to support keypress events on CRM forms. These methods will be useful to provide immediate feedback on key press. Traditionally, all the validations and actions were executed via the “on Change” event. These methods include
    • addOnKeyPress
    Use this method to attach an event handler to the keypress event
    • removeOnKeyPress
    Use this method to remove an event handler to the keypress event
    • removeOnKeyPress
    Use this method to manually fire an event handler to the keypress event
    For this blog, I have created sample code that will stop the input of numbers in the name field of the account record.
    Here are the steps
    1. Create a new JScript web resource and add the following code to it.

       // JavaScript source code  
       function keyPress()  
       {  
         //attach the validateInput function to the keypress event of the name attribute  
         Xrm.Page.getControl("name").addOnKeyPress(validateInput);    
       }  
       function validateInput() {  
         //get the value of the name field  
         var input = Xrm.Page.getControl("name").getValue();  
         if (input != "") {  
           //check if the last key pressed is a number  
           if (isNaN(input.substr(input.length - 1)) == false) {  
             //display the message  
             alert("Numeric values are not allowed in the account name");  
           }  
         }  
       }  
      

    2. Save and publish the web resource.
    3. Open the account form in customization mode.
    4. Add the JScript web resource to the form and call the keypress() method from load.
    5. Save and publish the account form.
    6. Test the code. If you try to press a number key on the name field you will get an error message as shown in the following screenshot.